Last Updated On - January 18th, 2024 Published On - May 23, 2023
Supercharge your Laravel project with must-have packages! Learn how to install Laravel debug bar, Laravel Sanctum Socialite, etc. to boost performance and save time.
Laravel is a popular PHP framework that offers a rich ecosystem of packages that can greatly enhance your development workflow and productivity. Here we will explore the essential Laravel packages that every developer should consider installing and setting up before starting a project. Whether you’re a beginner or an experienced Laravel developer, these packages will provide you with the tools and functionalities to build robust and efficient applications. So, let’s dive in!
Project Setup
Create a Laravel project using the following command:
composer create-project --prefer-dist laravel/laravel laravel-basics
Once the above command is executed successfully, you will see a folder named laravel-basics at the location where you’ve executed the command.
Go inside the laravel-basics folder by using the command cd laravel-basics
Serve the project
php artisan serve

Open http://127.0.0.1:8000 on your browser, you’ll see Laravel project up and running.
A. Laravel Debugbar
One of the must-have packages for Laravel developers is the Laravel Debugbar. It provides a handy toolbar that gives you insights into the performance and debugging information of your application. With the Debugbar, you can monitor SQL queries, view the timeline of executed code, analyze memory usage, and much more. Installing this package will help you debug and optimize your code during development.
Installation
Run the following command in your terminal to install the Laravel Debugbar package
composer require barryvdh/laravel-debugbar --dev
Configuration
Laravel uses Package Auto-Discovery, you don’t need to add the ServiceProvider manually. Just add `APP_DEBUG = true` in environment file(`.env`)
If laravel setup without auto-discovery package then you need to add the ServiceProvider manually in the following manner.
Add the service provider to the providers’ array in config/app.php
Barryvdh\Debugbar\ServiceProvider::class,
Add this to your facades in app.php to use the facade to log messages:
'Debugbar' => Barryvdh\Debugbar\Facades\Debugbar::class,
php artisan vendor:publish --provider="Barryvdh\Debugbar\ServiceProvider"
Usage
Now by using the Facade add messages with the PSR-3 levels (debug, info, notice, warning, error, critical, alert, emergency):
Debugbar::info($object);
Debugbar::error('Error!');
Debugbar::warning('Watch out…');
Debugbar::addMessage('Another message', 'mylabel');
For time tracking/performance measurement in laravel
Debugbar::startMeasure('render','Time for rendering');
Debugbar::stopMeasure('render');
Debugbar::addMeasure('now', LARAVEL_START, microtime(true));
Debugbar::measure('My long operation', function() {
    // Do something…
});
Also Read: Learn How to Use the Slack API to Post Messages in Slack Channel Using Laravel
B. Laravel Sanctum
It is a lightweight package for Laravel that provides a simple and secure way to authenticate APIs or single-page applications (SPAs) using token-based authentication. It allows you to generate API tokens and authenticate requests, making it ideal for building stateless, token-based authentication systems.
Installation
Run the following command in your terminal to install the Laravel Sanctum package
composer require laravel/sanctum
Configuration
Publish the Sanctum configuration and migration files using the vendor:publish Artisan command. The sanctum configuration file will be placed in your application’s config directory
php artisan vendor:publish --provider="Laravel\Sanctum\SanctumServiceProvider"
Run migrate command to create a database table to store API tokens
php artisan migrate
Add Middleware
Add middleware to your api middleware group in app/Http/Kernel.php file
'api' => [
    \Laravel\Sanctum\Http\Middleware\EnsureFrontendRequestsAreStateful::class,
    \Illuminate\Routing\Middleware\ThrottleRequests::class.':api',
    \Illuminate\Routing\Middleware\SubstituteBindings::class,
],
Issuing API Tokens
To begin issuing tokens for users, your User model should use the Laravel\Sanctum\HasApiTokens trait:
use Laravel\Sanctum\HasApiTokens;

class User extends Authenticatable
{
    use HasApiTokens, HasFactory, Notifiable;
}
Add API guards
Add token to API gaurds
'guards' => [
        'web' => [
            'driver' => 'session',
            'provider' => 'users',
        ],
        'api' => [
            'driver' => 'token',
            'provider' => 'users',
        ],
    ],
Also Read: Laravel Image Compression Project in 10 Minutes
C. Laravel Socialite
When it comes to integrating social authentication into your Laravel application, Laravel Socialite is a go-to package. It simplifies the process of authenticating users through various social platforms like Facebook, Google, Twitter, and GitHub. By setting up Socialite, you can enable social login functionality with minimal effort, saving you time and development resources.
Installation
Run the following command
composer require laravel/socialite
Configuration
Create OAuth credentials from the social login platform that your app is going to use for authentication. Add OAuth credentials to your application’s config/services.php configuration file.
'google' => [
        'client_id' => '582347641793-2f73ejmay5d65d6adgy3getd7j6egl4a.apps.googleusercontent.com',
        'client_secret' => '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o_qk',
        'redirect' => 'http://localhost:8000/authorized/google/callback',
    ]
Authentication
Create 2 routes to authenticate users using an OAuth provider. One route for redirecting the user to the OAuth provider, and another for receiving the callback from the provider after authentication.
use Laravel\Socialite\Facades\Socialite;

Route::get('/auth/redirect', function () {
    return Socialite::driver('google')->redirect();
});

Route::get('/auth/callback', function () {
    $user = Socialite::driver('google')->user();

    // $user->token
    try {
            $user = Socialite::driver('google')->user();
            // dd($user);
            $finduser = User::where('google_id', $user->id)->first();

            if ($finduser) {
                Auth::login($finduser);
                return redirect()->intended('dashboard');
            } else {
                $names = explode(' ', $user->name);
                $newUser = User::create([
                    'fname' => $names[0],
                    'lname' => $names[1],
                    'email' => $user->email,
                    'google_id' => $user->id
                ]);

                Auth::login($newUser);

                return redirect()->intended('dashboard');
            }
        } catch (Exception $e) {
            return back()->with('error', $e->getMessage());
        }
});
Also Read: Laravel Image Resize Project in 10 Minutes
D. Laravel API Response Helper
Laravel API Response Helper provides consistent API responses throughout your Laravel application to simplify the process of sending consistent and structured responses from your API endpoints. It helps you format and standardize your API responses, making it easier for clients consuming your API to understand and handle the data.
Installation
Run the following command
composer require f9webltd/laravel-api-response-helpers
Configuration
Only reference the required trait within your controller:
<?php

namespace App\Http\Controllers\Api;

use App\Models\User;
use F9Web\ApiResponseHelpers;

class ApiController extends Controller
{
    use ApiResponseHelpers;
    public function index()
    {
        $users = User::all();
        return $this->respondWithSuccess($users);
    }
}
Available response methods
1. respondNotFound(string|Exception $message, ?string $key = ‘error’)
Returns a 404 HTTP status code, an exception object can optionally be passed.
2. respondWithSuccess(array|Arrayable|JsonSerializable|null $contents = null)
Returns a 200 HTTP status code, optionally $contents to return as json can be passed. By default returns ['success' => true].
Returns a 200 HTTP status code
4. respondUnAuthenticated(?string $message = null)
Returns a 401 HTTP status code
5. respondForbidden(?string $message = null)
Returns a 403 HTTP status code
6. respondError(?string $message = null)
Returns a 400 HTTP status code
7. respondCreated(array|Arrayable|JsonSerializable|null $data = null)
Returns a 201 HTTP status code, with response optional data
8. respondNoContent(array|Arrayable|JsonSerializable|null $data = null)
Returns a 204 HTTP status code, with optional response data. Strictly speaking, the response body should be empty. However, functionality to optionally return data was added to handle legacy projects. Within your own projects, you can simply call the method, omitting parameters, to generate a correct 204 response i.e. return $this->respondNoContent()
9. setDefaultSuccessResponse(?array $content = null): self
Optionally, replace the default ['success' => true] response returned by respondWithSuccess with $content. This method can be called from the constructor (to change the default for all calls), a base API controller, or a place when required.
$users = collect([10, 20, 30, 40]);

return $this->setDefaultSuccessResponse([])->respondWithSuccess($users);
Also Read: Create Short URL Hashing & Tracking Project in 10 Minutes
E. Mailtrap
With the help of Mailtrap, you may test email functionality while it is still in development without actually sending emails to actual recipients. You can intercept and examine emails received from your Laravel application using the fake SMTP server that is provided.
Installation
The mail package is included by default in Laravel 8 and later. Use the following command to install it individually if you’re using an earlier version
composer require illuminate/mail
Create a Mailtrap Account
- Go to the Mailtrap website (https://mailtrap.io) and create a new account if you don’t have one.
- Once logged in, create a new inbox by clicking on the “Create new inbox” button.
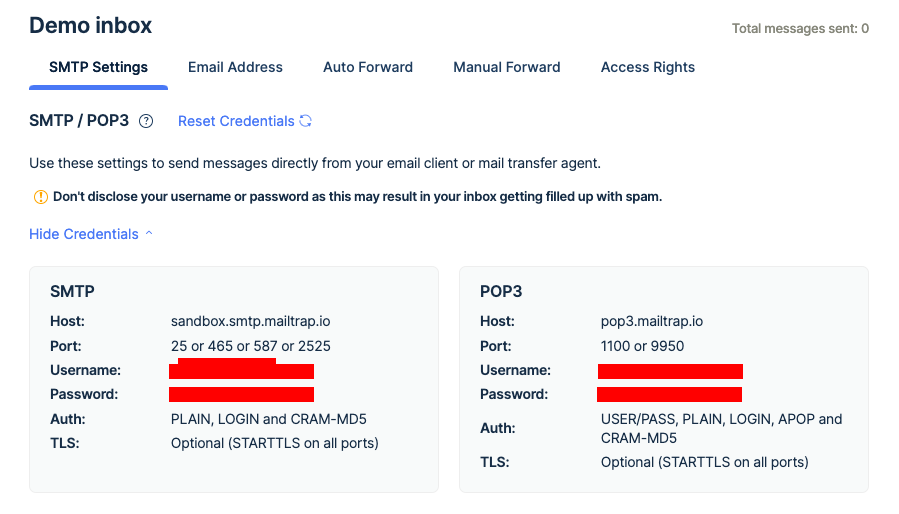
Configuration
- Open the
.envfile in the root directory of your Laravel project. - Locate the
MAIL_MAILERvariable and set its value tosmtp. - Set the following variables with your Mailtrap inbox credentials:
MAIL_MAILER=smtp
MAIL_HOST=sandbox.smtp.mailtrap.io
MAIL_PORT=587
MAIL_USERNAME=your-mailtrap-username
MAIL_PASSWORD=your-mailtrap-password
MAIL_ENCRYPTION=tls
MAIL_FROM_ADDRESS=prashant12it@gmail.com
MAIL_FROM_NAME="${APP_NAME}"
Test Email
- Create mailable
php artisan make:mail EmployeeRegistration
app/Mail/EmployeeRegistration.php
<?php

namespace App\Mail;

use Illuminate\Bus\Queueable;
use Illuminate\Contracts\Queue\ShouldQueue;
use Illuminate\Mail\Mailable;
use Illuminate\Queue\SerializesModels;

class EmployeeRegistration extends Mailable
{
    use Queueable, SerializesModels;
    public $details;
    /**
     * Create a new message instance.
     *
     * @return void
     */
    public function __construct($details)
    {
        $this->details = $details;
    }

    /**
     * Build the message.
     *
     * @return $this
     */
    public function build()
    {
        return $this->subject($this->details['subject'])
                    ->view('emails.employee-registration');
    }
}
2. Create email view
resources/views/emails/employee-registration.blade.php
<!DOCTYPE html>
<html>
<head>
    <title>Send email via Mailtrap </title>
</head>
<body>
    <h1>{{ $details['title'] }}</h1>
    <p>{{ $details['body'] }}</p>

    <p>Thank you</p>
</body>
</html>
3. Create controller
app/Http/Controllers/EmployeeRegistrationController.php
<?php

namespace App\Http\Controllers;
use Illuminate\Http\Request;
use Illuminate\Support\Facades\Mail;

class EmployeeRegistrationController extends Controller
{
     function sendEmployeeEmail(){
          $details = [
              'email' => 'prashant12it@gmail.com',
              'title' => 'Mail from ItSolutionStuff.com',
              'body' => 'This is for testing email using smtp'
          ];
          return Mail::to($details['email'])->send(new EmployeeRegistration($details));
     }
}
4. Create Route
routes/web.php
<?php

use Illuminate\Support\Facades\Route;

Route::get('send-email', 'EmployeeRegistrationController@sendEmployeeEmail');
php artisan serve
Open http://127.0.0.1:8000/send-email in your browser
Access Mailtrap Inbox
- Visit the Mailtrap website and select your inbox.
- You should see the email sent from your Laravel application in the inbox. Click on it to view its contents, including the HTML and text versions of the email.