Last Updated On - August 2nd, 2024 Published On - Dec 13, 2023
Google Calendar is a powerful tool for managing events and schedules. In this post, you will learn, how to integrate Google Calendar API in your Laravel 10(Php) project to send bulk calendar invites effortlessly. Integrating Google Calendar API into your Laravel application can enhance its functionality significantly.
Whether you’re building a collaborative scheduling platform or event management system, or want to leverage Google Calendar features within your Laravel project, you will get each bit of the integration process from this knowledge base.
Prerequisites
Before we dive into the integration steps, make sure you have the following:
- A Laravel project up and running.
- Basic knowledge of Laravel and web development.
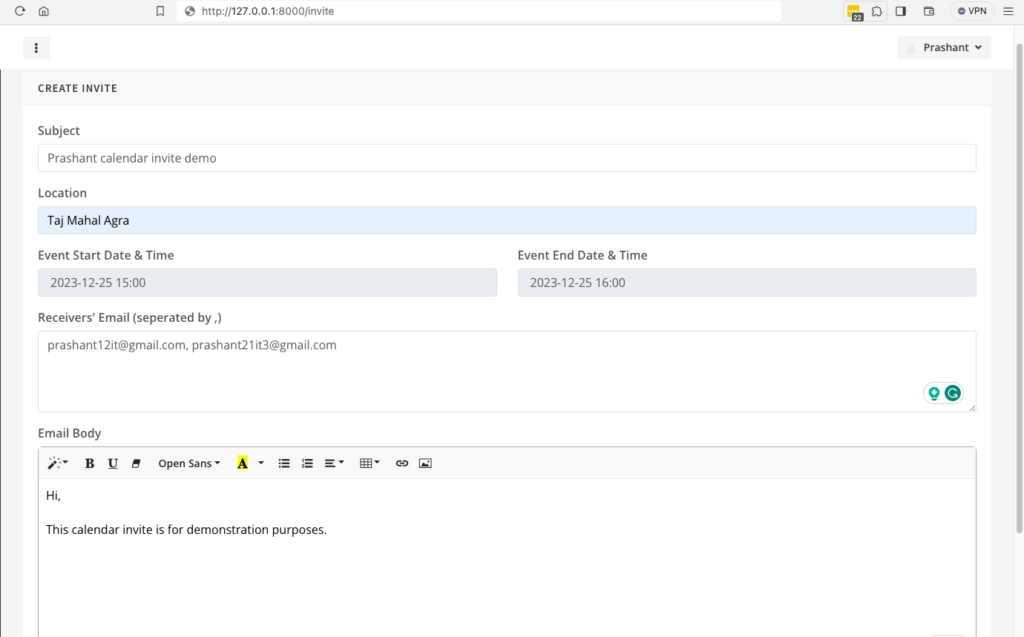
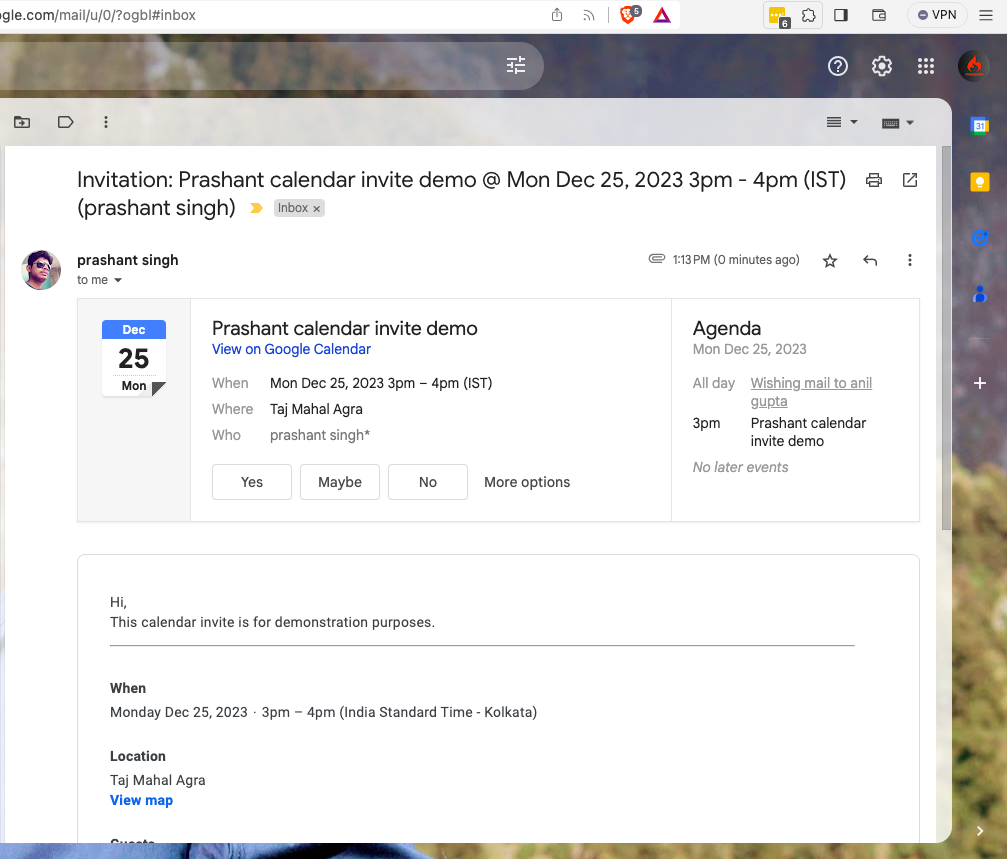
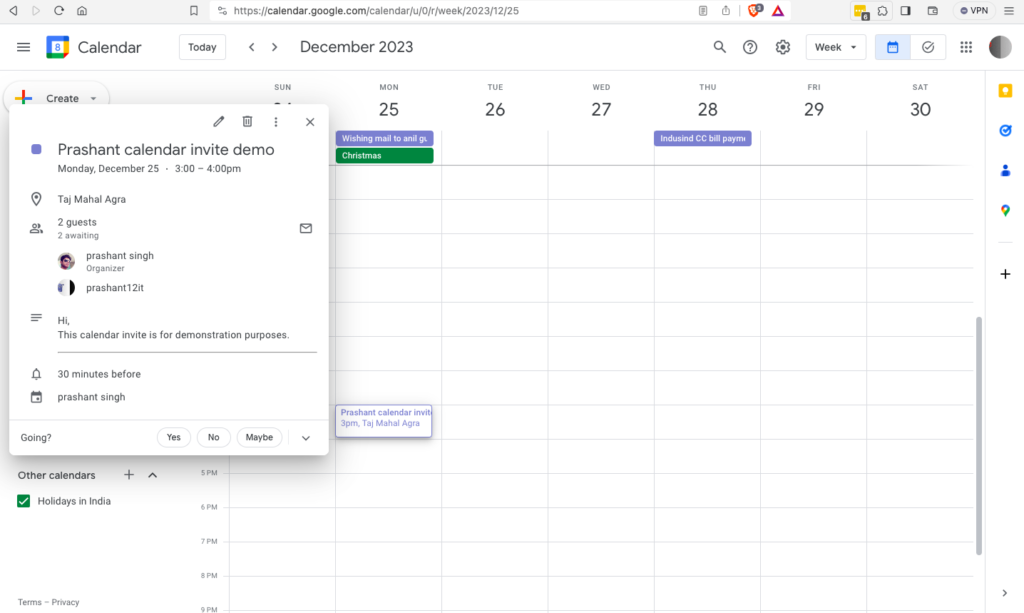
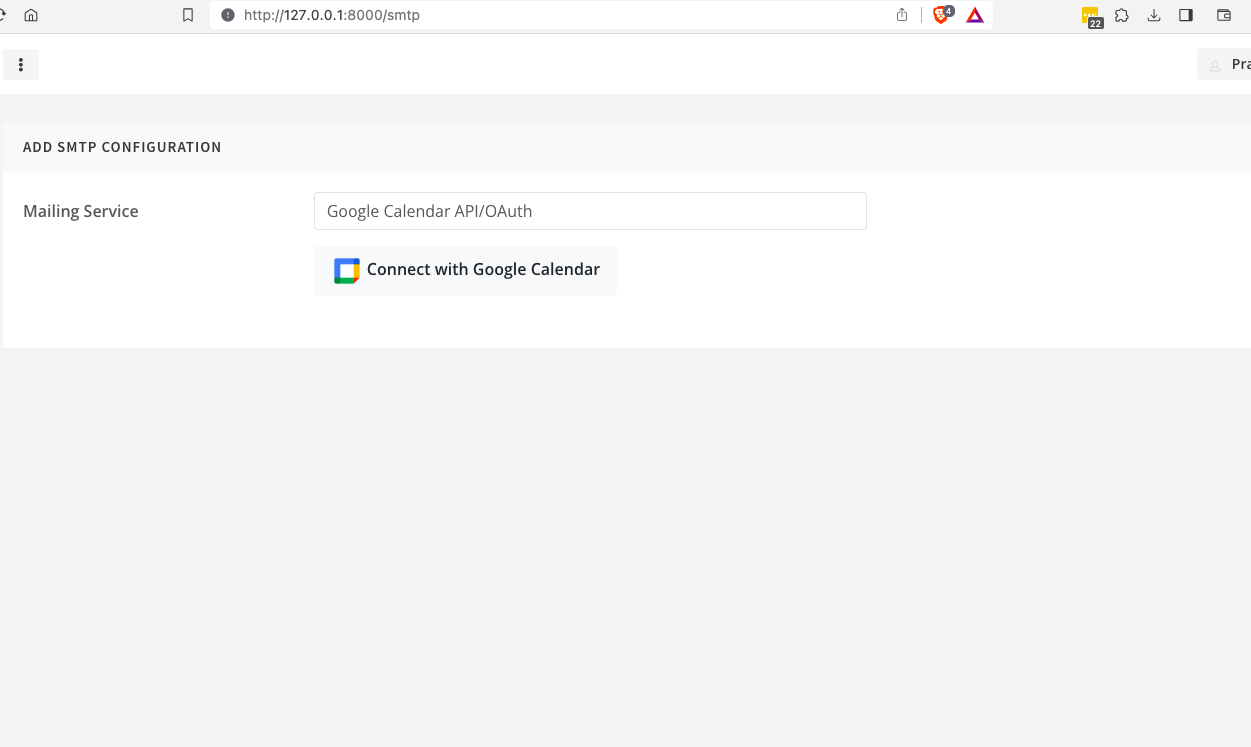
Expected Result
Input
Output

Also Read: How To Setup Real-Time Synchronization Using WebSocket with Laravel 11, Pusher, & Angular 18?
Step 1: Set Up Google Cloud Project and Enable Calendar API
In this step, we’ll create a project in the Google Cloud Console, enable the Google Calendar API service, and configure the basic project details.
Steps to setup
- Go to the Google Cloud Console
- Navigate to Google Cloud Console.
- Create a New Project
- Click on the project dropdown in the top navigation bar.
- Click on “New Project.”
- Enter a name for your project and click “Create.”
- Enable Google Calendar API
- In the sidebar, click on “APIs & Services” > “Library.”
- Search for “Google Calendar API” and select it.
- Click on “Enable.”
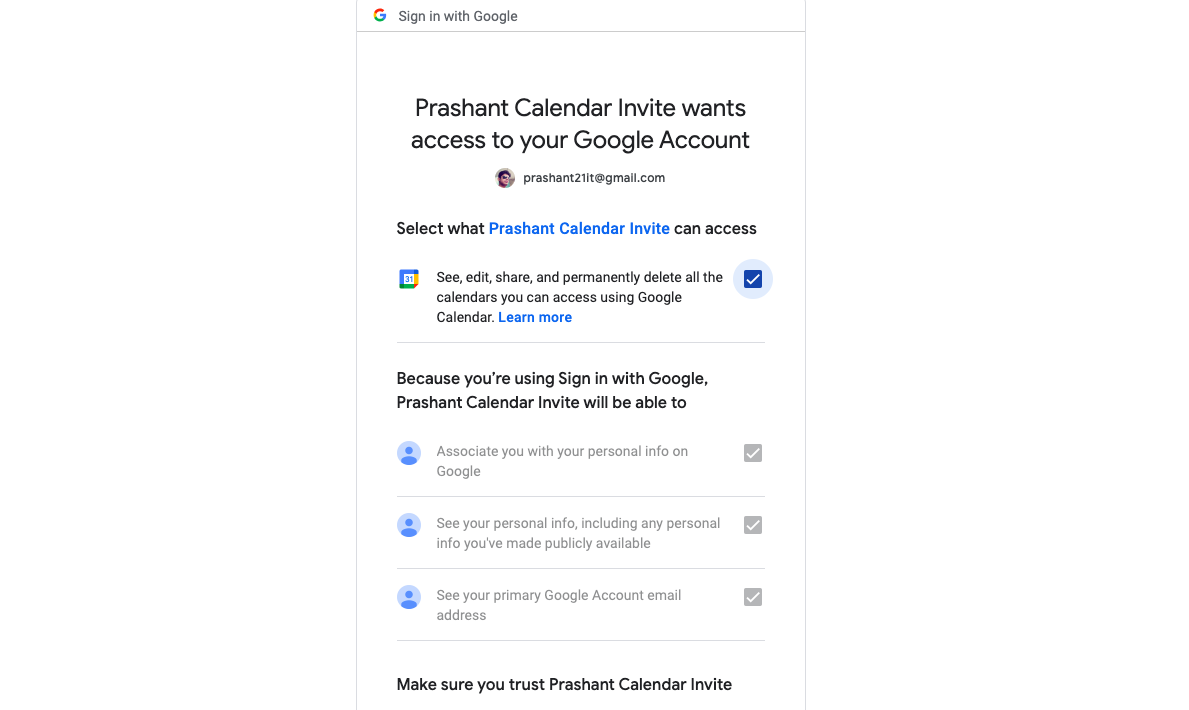
- Configure OAuth Consent Screen
- In the sidebar, click on “APIs & Services” > “OAuth consent screen.”
- Fill in the required information, including your application name, domain, privacy policy link, terms and conditions link, and app logo.
- Under “Scopes for Google APIs,” add the necessary scopes (e.g.,
https://www.googleapis.com/auth/calendar,https://www.googleapis.com/auth/userinfo.email,https://www.googleapis.com/auth/userinfo.profile). - Add test users’ emails under “Test users”. You can do the testing only on these accounts unless app is publically available.
- Create OAuth Credentials
- In the sidebar, click on “APIs & Services” > “Credentials.”
- Click on “Create Credentials” and choose “OAuth client ID.”
- Select “Web application” as the application type.
- Add an authorized redirect URL (e.g.,
https://your-app.com/oauth/callback). For the project I’m demonstrating in this post I’ve addedhttp://127.0.0.1:8000/gcallbackandhttp://localhost:8000/gcallback
- Save and Note Down Credentials
- Save your OAuth client ID and secret for later use in your Laravel application.
Video Demonstration
Congratulations! You have successfully set up your Google Cloud Project and configured the necessary credentials. In the next step, we will integrate these credentials into your Laravel application.
Step 2: Add Google Calendar API Credentials to Laravel Application
In this step, we will integrate the Google Calendar API credentials into your Laravel application by adding them to the .env file.
Instructions
- Open Your Laravel Project
- Open your Laravel project in your preferred code editor.
- Locate the
.envFile- Navigate to the root directory of your Laravel project.
- Locate the
.envfile.
- Add Google Calendar API Credentials
- Open the
.envfile and add the following lines with your actual values
- Open the
APP_URL=http://127.0.0.1:8000
GOOGLE_PROJECT_ID="prashant-calendar-invite-demo"
GOOGLE_CLIENT_ID="99999951693-8fjqs4a4ofs51hk5uivqlxxxxxxxxx.apps.googleusercontent.com"
GOOGLE_CLIENT_SECRET="GOCSPX-8DkbxZOfM2OKxAJReXXXXXXXXX"
GOOGLE_REDIRECT_URI="${APP_URL}/gcallback"
GOOGLE_ALLOW_MULTIPLE_CREDENTIALS=true
GOOGLE_ALLOW_JSON_ENCRYPT=false
Replace the values with the credentials you obtained from the Google Cloud Console and save the file(.env)
The project is now configured with the necessary Google Calendar API credentials. In the next step, we will install and configure the Laravel-Gmail package.
Also Read: Solution To All Common Docker Setup Issues
Step 3: Install and Configure Laravel Gmail Package
In this step, we will install the laravel-gmail package, which simplifies the integration of Gmail services in Laravel applications.
Package Installation
A. Install the Package via Composer Run the following command in your terminal to install the laravel-gmail package:
composer require dacastro4/laravel-gmail
B. Update config/app.php
Open the config/app.php file and add the LaravelGmailServiceProvider to the providers array:
'providers' => [
    // Other providers...
    Dacastro4\LaravelGmail\LaravelGmailServiceProvider::class,
],
C. Add Alias for the Package
Still in the config/app.php file, add an alias for the LaravelGmail facade to the aliases array:
'aliases' => [
    // Other aliases...
    'LaravelGmail' => Dacastro4\LaravelGmail\Facade\LaravelGmail::class,
],
Configuration
A. Publish the Configuration File
Run the following command to publish the configuration file:
php artisan vendor:publish --provider="Dacastro4\LaravelGmail\LaravelGmailServiceProvider"
This command will add a gmail.php file in the config folder, allowing you to modify configuration details like scopes, credential file name, etc.
Now, you have successfully installed and configured the laravel-gmail package. In the next step, we will implement the authentication flow and set up the calendar service.
Also Read: Create Short URL Hashing & Tracking Project in 10 Minutes
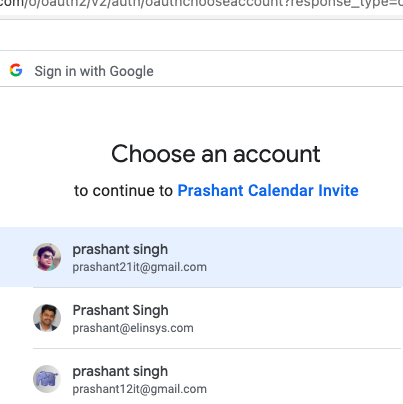
Step 4: Set Up Redirect URI and OAuth Callback Method
In this step, we will configure the redirect URI and implement the OAuth callback method in your Laravel application. Additionally, we’ll create a table to store access tokens, refresh tokens, and other necessary details.
Configure Redirect URI
i. Add OAuth Callback Route
Open your routes/web.php file and add the following route definition:
// routes/web.php

Route::group(["middleware" => ['auth', 'auth.users']], function () {
    Route::get('/gcallback', 'GoogleApiController@gcallback')->name('googleCallback');
});
This ensures that only authenticated users with accounts in your application can access the Google Calendar API.
Database Table Creation for Token Management
i. Create the SMTP Config Table
Run the following command to generate a model and migration for the SMTPConfig table:
php artisan make:model SMTPConfig -m
This will create a migration file in the database/migrations directory.
ii. Migration Code for smtp_config Table
Open the generated migration file (e.g., database/migrations/YYYY_MM_DD_create_smtp_config_table.php) and add the following code:
// database/migrations/YYYY_MM_DD_create_smtp_config_table.php

public function up()
{
    Schema::create('smtp_config', function (Blueprint $table) {
        $table->id();
        $table->unsignedBigInteger('user_id');
        $table->foreign('user_id')->references('id')->on('users')->onDelete('cascade')->comment('Users');
        $table->string('email');
        $table->string('secret_key');
        $table->string('refresh_token');
        $table->string('token_id')->nullable();
        $table->timestamps();
    });
}

public function down()
{
    Schema::dropIfExists('smtp_config');
}
Run the migration to create the smtp_config table:
php artisan migrate
Callback method
i. Create GoogleApiController
Run the following command to generate the GoogleApiController
php artisan make:controller GoogleApiController
ii. Implement gcallback Method
Open app/Http/Controllers/GoogleApiController.php and add the following code to the gcallback method:
// app/Http/Controllers/GoogleApiController.php

use App\Models\SMTPConfig;
use Illuminate\Support\Facades\Crypt;
use Illuminate\Support\Facades\Auth;
use Dacastro4\LaravelGmail\Facade\LaravelGmail;

// ...

public function gcallback()
{
    if (isset($_GET['error']) && $_GET['error'] == 'access_denied') {
        return redirect('/smtp')->with('error', 'Access denied');
    }

    if (file_exists(storage_path('app/gmail/tokens/gmail-json-' . Auth::user()->id . '.json'))) {
        unlink(storage_path('app/gmail/tokens/gmail-json-' . Auth::user()->id . '.json'));
    }

    $gToken = LaravelGmail::makeToken();

    $tokenPayload = LaravelGmail::verifyIdToken($gToken['id_token']);
    if (empty($tokenPayload)) {
        return redirect()->back()->with('error', 'SMTP not configured, Try again');
    }

    $smtpconfig = array(
        'user_id' => Auth::user()->id,
        'email' => $tokenPayload['email'],
        'secret_key' => Crypt::encrypt($gToken['access_token']),
        'refresh_token' => Crypt::encrypt($gToken['refresh_token']),
        'token_id' => Crypt::encrypt($gToken['id_token'])
    );

    $smtpConfigData = SMTPConfig::where(['user_id' => Auth::user()->id, 'email' => $tokenPayload['email']])->get()->pluck('id');
    if ($smtpConfigData && isset($smtpConfigData[0]) && !empty($smtpConfigData[0])) {
        SMTPConfig::where(['user_id' => Auth::user()->id, 'email' => $tokenPayload['email']])->update($smtpconfig);
    } else {
        SMTPConfig::insert($smtpconfig);
    }

    return redirect()->back()->with("success", "Your Google Account is now Successfully connected");
}
This method handles the OAuth callback, retrieves the tokens, and stores them in the smtp_config table.
Now, your Laravel application is set up to handle Google Calendar API callbacks and store the necessary tokens. In the next step, we will implement the functionality to send calendar invites.
Also Read: How To Validate Location From IP & Zipcode Using Laravel 10?
Step 5: Send Calendar Invites
In this step, we will implement the method to compose and send calendar invites to specified receivers using the Google Calendar API.
Compose and Send Calendar Invites
A. Create the sendInvite Method
In your GoogleApiController.php file (located at app/Http/Controllers/GoogleApiController.php), add the following code for the sendInvite method:
// app/Http/Controllers/GoogleApiController.php

use App\Models\SMTPConfig;
use Illuminate\Support\Facades\Crypt;
use Illuminate\Support\Facades\Auth;
use Illuminate\Support\Facades\Validator;
use Illuminate\Http\Request;
use Carbon\Carbon;
use DateTimeZone;
use Google_Client as Google_Client;
use Google_Service_Calendar as Calendar;
use Google_Service_Calendar_Event as GSCEV;
use Google_Service_Calendar_EventDateTime as GSCEDT;
use Google_Service_Calendar_EventOrganizer as GSCEO;
use Dacastro4\LaravelGmail\Facade\LaravelGmail;

class GoogleApiController extends Controller
{
    // Other methods...

    public function sendInvite(Request $request)
    {
        $data = $request->all();

        $validator = Validator::make(
            $data,
            [
                'subject' => 'required',
                'receivers' => 'required',
                'content' => 'required|max:2000',
                'startdatetime' => 'required',
                'enddatetime' => 'required',
            ]
        );

        if ($validator->fails()) {
            return back()->withInput(request()->input())->withErrors($validator->errors());
        }

        $smtpConfig = SMTPConfig::where('user_id', Auth::user()->id)->first();
        $campDetails['sc_id'] = $smtpConfig->id;
        $campDetails['startdatetime'] = $data['startdatetime'];
        $campDetails['enddatetime'] = $data['enddatetime'];
        $campDetails['location'] = $data['location'] ?? '';
        $campDetails['subject'] = $data['subject'];
        $campDetails['content'] = $data['content'];
        $campDetails['calendar_id'] = $data['calendar_id'] ?? null;
        $receivers = explode(',', $data['receivers']);

        return $this->gCalenderInvite($campDetails, $receivers);
    }

    // Existing methods...

}
B. Implement the gCalenderInvite Method
Continuing in the GoogleApiController.php file, add the following code for the gCalenderInvite method:
// app/Http/Controllers/GoogleApiController.php

class GoogleApiController extends Controller
{
    // Other methods...

    public function gCalenderInvite($campDetails, $receivers, $updateInvite = 'N')
    {
        try {
            $smtpConfig = SMTPConfig::where('user_id', Auth::user()->id)->first();
            $refToken = Crypt::decrypt($smtpConfig->refresh_token);
            $accToken = LaravelGmail::refreshToken($refToken);
            if (isset($accToken['refresh_token']) && !empty($accToken['refresh_token'])) {
                $smtpconfig = array('refresh_token' => Crypt::encrypt($accToken['refresh_token']), 'token_id' => Crypt::encrypt($accToken['id_token']));
                SMTPConfig::where(['id' => $campDetails['sc_id']])->update($smtpconfig);
            }
            $token = $accToken['access_token'];
            $client = new Google_Client();
            $client->setAccessToken($token);
            $service = new Calendar($client);

            $calendarId = 'primary';

            $tz = new DateTimeZone('Asia/Kolkata');

            $startDateTimeArr = explode(" ", $campDetails['startdatetime']);
            $startDateArr = explode("-", $startDateTimeArr[0]);
            $startTimeArr = explode(":", $startDateTimeArr[1]);
            $endDateTimeArr = explode(" ", $campDetails['enddatetime']);
            $endDateArr = explode("-", $endDateTimeArr[0]);
            $endTimeArr = explode(":", $endDateTimeArr[1]);

            $startTime = Carbon::create(
                $startDateArr[0],
                $startDateArr[1],
                $startDateArr[2],
                $startTimeArr[0],
                $startTimeArr[1],
                $startTimeArr[2],
                $tz
            );
            $endTime = Carbon::create(
                $endDateArr[0],
                $endDateArr[1],
                $endDateArr[2],
                $endTimeArr[0],
                $endTimeArr[1],
                $endTimeArr[2],
                $tz
            );
            // Use the Google date handling provided by the Google Client
            $googleStartTime = new GSCEDT();
            $googleStartTime->setTimeZone('Asia/Kolkata');
            $googleStartTime->setDateTime($startTime->format('c'));
            $googleEndTime = new GSCEDT();
            $googleEndTime->setTimeZone('Asia/Kolkata');
            $googleEndTime->setDateTime($endTime->format('c'));
            // Create the calendar event and give a default title.
            $event = new GSCEV();
            $event->setStart($googleStartTime);
            // Same process to create end time as we use for the start time above.
            $event->setEnd($googleEndTime);

            foreach ($receivers as $receiver) {

                $fname = explode('@',$receiver['email'])[0];
                $email = $receiver['email'];

                $location = $campDetails['location'];

                $summary = $campDetails['subject'];
                $organizer_email = $smtpConfig->email;
                $organizer_name = Auth::user()->name;


                $descString = $campDetails['content'];
                $oldBody = array('{first-name}', '{webinar-title}', '{webinar-start-datetime}', '{webinar-end-datetime}', '{attendee-email}', '{event-url}');
                $newBody = array($fname, $summary, $campDetails['startdatetime'], $campDetails['enddatetime'], $email, $location);
                $body = str_replace($oldBody, $newBody, $descString);
                $summary = str_replace($oldBody, $newBody, $summary);
            }


            $event->setSummary($summary);
            $event->setDescription($body);
            $event->setLocation($location);
            $gOrganizer = new GSCEO();
            $gOrganizer->setDisplayName($organizer_name);
            $gOrganizer->setEmail($organizer_email);
            $event->setOrganizer($gOrganizer);
            $event->setAttendees([
                ['email' => $organizer_email, 'displayName' => $organizer_name, 'organizer' => true],
                ['email' => $email, 'displayName' => $fname, 'organizer' => false]
            ]);
            if ($updateInvite == 'Y') {
                $response = $service->events->update($calendarId, $campDetails['calendar_id'], $event, ['sendUpdates' => 'all', 'supportsAttachments' => true]);
            } else {
                $response = $service->events->insert($calendarId, $event, ['sendUpdates' => 'all', 'supportsAttachments' => true]);
            }
            if ($response && isset($response->id)) {
                return redirect()->back()->with("success", "Invites sent successfully");
            } else {
                return redirect()->back()->with("error", "Something goes wrong, please try later.");
            }
        } catch (Exception $e) {
            Log::info($e->getMessage());
            return redirect()->back()->with("error", "Error " . $e->getMessage());
        }
    }

    // Other methods...

}
This method handles the process of sending calendar invites based on the provided details.
Now, our Laravel application is equipped to compose and send calendar invites using the Google Calendar API. Create a form in the Blade template for composing and sending invites.
Also Read: Laravel 10 Slack API to Send Notifications in Slack Channel
FAQs
Why is there a need to integrate Google Calendar API with Laravel 10 for sending bulk invites?
To enhance the functionality of Laravel applications by allowing them to send bulk calendar invites effortlessly using the powerful features of Google Calendar API.
Why is Google Calendar API integration crucial for managing events and schedules within Laravel projects?
Google Calendar API provides a robust tool for managing events and schedules, and integrating it into Laravel projects can significantly improve their event management capabilities.
Why is the setup of a Google Cloud Project and enabling Calendar API necessary for this integration?
The setup involves creating a project, enabling the Calendar API service, and configuring OAuth consent screen and credentials, which are prerequisites for establishing a secure connection between the Laravel application and Google Calendar API.
Why is the integration process complex, requiring steps such as configuring OAuth consent screen, creating OAuth credentials, and adding Google Calendar API credentials to Laravel application?
The complexity arises from the need to ensure secure authentication and authorization between the Laravel application and Google Calendar API. Configuring OAuth consent, creating credentials, and adding them to the application are crucial steps for establishing a secure and functional integration.
Why is the Laravel-Gmail package used, and why is it necessary to install and configure it for this integration?
The Laravel-Gmail package simplifies the integration of Gmail services within Laravel applications, which is essential for handling email-related functionalities associated with calendar invites. Installation and configuration of this package streamline the process.
Free Gift 🎁: Open Source 2024: Download Free Bootstrap5 HTML Templates
Summary
Congratulations! You’ve successfully integrated the Google Calendar API into the Laravel application, opening up a world of possibilities for event management and scheduling. This post has guided you through each step, ensuring a smooth integration process. The challenges arise from the details of defining an OAuth consent, setting up a Google Cloud Project, enabling the Calendar API, generating OAuth credentials, and integrating Gmail services. The post takes a methodical approach to addressing these issues, offering a solution that makes use of the Google Calendar API and related services to improve the event management capabilities of Laravel apps.
Recap of Key Steps
- Google Cloud Setup: We started by creating a Google Cloud project, enabling the Calendar API, and obtaining essential credentials.
- Laravel Configuration: You learned how to configure your Laravel application with the necessary Google Calendar API credentials, laying the foundation for seamless integration.
- Laravel Gmail Package: The installation and configuration of the
laravel-gmailpackage streamlined the interaction with Gmail services, making the integration more efficient. - OAuth Callback and Database Setup: We set up the OAuth callback route, created a database table to store access tokens, and implemented the necessary methods in the
GoogleApiController. - Sending Calendar Invites: The final step involved creating a method to compose and send calendar invites, showcasing the practical use of the integrated Google Calendar API.